
WISDM FAQs
Q: How do I navigate to WISDM?
A: The web address is: https://wisdm2.doit.wisc.edu/wisdm2/Main.aspx
Q: I forgot my password. Whom should I contact to have it reset?
A: Contact a WISDM Administrator for your institution. If you contact the WISDM developers, they will forward it to an institution WISDM Administrator; they will not reset your password.
Q: What does the 'Database Status' box mean?
A: The 'Database Status' box states that the financial information loaded to WISDM during the most recent load matches the information in SFS. If the data matches, the 'Status of Data' will state "No Errors" and look like the following: 
Click on the status message to see detailed information on the journals loaded during the previous 5 days.
If there are problems with the data, the status will state "Errors". If the SFS journal posting process is not completed by the start of the WISDM load, the status message will state "No data loaded due to posting delays" or "SFS posting not finished when load began, some or all data may be missing from previous day."
Q: Besides the 'Database Status' box, what should I know about the main page?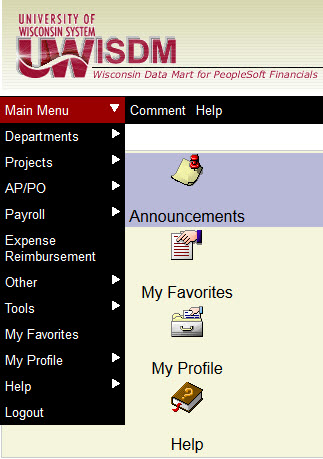
A: The black bar across the top of every screen has several functions. Choose the 'Main Menu' dropdown arrow to see navigation options and sub-menus. You can also click the 'Comment' link next to the 'Main Menu' link to send a message to the WISDM development staff. Use this function to convey messages regarding problems, enhancement ideas, or to tell WISDM development staff that you like features available in WISDM.
The far right portion of the black bar is used to change the fiscal year and business unit for the data seen. (If you only have access to one business unit, the business unit dropdown box is not available, it will be hard-coded with your business unit.)

Q: What is the difference between the Department ‘Search’ and ‘Rollup’ features?
A: Selecting “Search” will load a search screen. This allows you to limit the Departments returned to a manageable number. Selecting “Rollup” will load the rollup search. This feature allows the user to combine multiple Departments within one report.
Q: What fields are used in the Department ‘Search’?
A: The ‘Search’ function uses the following fields to query the database. Any combination of the fields can be used to search.
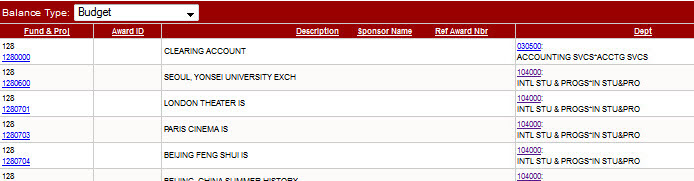
Fund: Enter one complete fund (i.e. 128).
Dept: Enter the department ID. A dropdown list contains:
is exactly- enter the complete 6 character department ID
starts with – enter part of a department ID
Descr: Enter the department description. A dropdown list contains:
is exactly – enter the organization description exactly as it appears in SFS
contains – enter part of an organization description
starts with – enter the beginning of an organization description
Mgr: Enter the department manager name. A dropdown list contains:
is exactly – enter the manager name exactly as it appears in SFS
contains – enter part of a manager name as it appears in SFS
starts with – enter the beginning of a manager name
Records per Page: Select the number of result records to view on each page. The options are 50, 100, and 500.
A: Selecting “Search” will load a search screen. This allows you to limit the Departments returned to a manageable number. Selecting “Rollup” will load the rollup search. This feature allows the user to combine multiple Departments within one report.
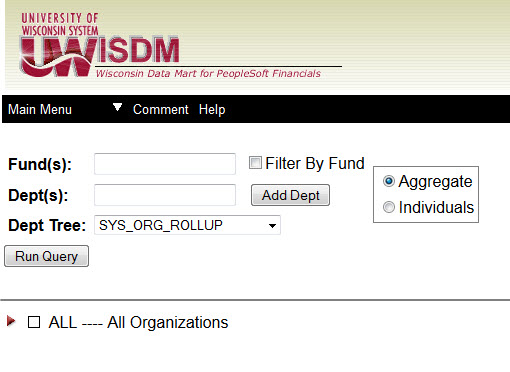
A: The Department ‘Rollup’ feature allows you to create one summary report with multiple Departments. You only can use one fund in the report. You also have the ability to save queries that are run frequently. To use the feature, enter one fund, and at least one Department. Click the “Add Dept” button to add each Department to the query criteria. When you have all the needed Departments added, press the “Run Query” button. A summary report will be created.
Q: In the Department ‘Rollup’ feature, what are the different Department trees available? What do I do with those trees?
A: These trees determine what Departments will show up in your report. The trees are maintained in SFS. The Department used in the rollup must be in the selected tree, or it will not be selected.
Q: In the Department ‘Rollup’ feature, what does the ‘Filter by Fund’ box do?
A: The ‘Filter by Fund’ checkbox will limit the tree to show Departments that only have transactions in the fiscal year and Fund which you entered. This feature can take a long time to run when using an institution-wide Fund (100, 101, 128, etc.). For example, if you enter Fund 144 and click on the ‘Filter by Fund’ checkbox, when viewing the tree, only Departments that have activity in Fund 144 will appear in the tree.
Q: What can I enter in the ‘Add Dept’ box on the department ‘Rollup’ feature?
A: You can enter:
- A single organization level (i.e. 201000).
- A list of organization levels, separated by commas (i.e. PRESIDENT or GENERAL, ACADEMIC AFFAIRS).
- A list of single organizations and ranges separated by commas (i.e. 204000, 201000, 203000).

Q: Why does the tree show up on the bottom of the page on the ‘Rollup’ feature?
A: Instead of entering department ID’s using “Add Dept”, you can click the levels on the tree to select Departments or whole groups of Departments to include in your query. Use the triangular menu items to navigate the lists, and the check-boxes to select an item.
In the example above, PRESIDENT was entered in the “Add Dept” box. However, you can select the same tree node from the tree and get the same results. Notice also that the 3 departments under PRESIDENT are grayed out because they have been selected by definition.
Q: What does the ‘Locate’ button do on the department ‘Rollup’ feature?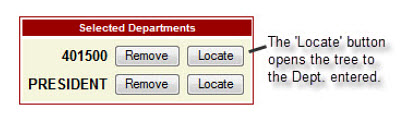
A: The ‘Locate’ button will expand the tree to the level of the node selected. This feature is useful to make sure the proper department is selected. The ‘Remove’ button will remove the department from your selection.
Q: What do the report options on the summary report do?
A: The report options will be the same regardless of what department is selected; however, the report may look different. The reports differ for GPR funds and non-GPR funds.
The report options allow the user to select the following options:
Project Option: Select “Only Departments”,“Both Departments and Projects” or “All Projects Summarized”. If the department does not have transactions both with and without Project ID’s, these options will not be selectable.
Time Period: Select the accounting periods to view in the summary report. The default value is Year To Date. The “advanced” link will allow selecting specific periods or quarters.
Account Tree: Select the account tree used to build the summary report. The account trees are created in PeopleSoft and are copied over to WISDM. For more information on the trees available for your business unit, contact your WISDM administrator.
Drilldown Level: Select the level of detail for the summary report. The drilldown level coincides with the account tree. The selections go from least detail to most detail. The lowest level of detail usually shows the individual accounts.
Program: Select the programs to view with the report. The only options for Program Code are to view all the program codes in the summary, or select only one program code. The program codes (formerly activity codes) are based upon the expenditure classification published by the National Association of College and University Business Officers (NACUBO). The programs used by UWSA are:
| Code | Description | Code | Description | Code | Description |
| 0 | Student Services | 4 | Research | 8 | Auxiliary Enterprises |
| 1 | Institutional Support | 5 | Public Service | 9 | Financial Aid |
| 2 | Instruction | 6 | Academic Support | F | Farm Operations |
| 3 | Hospitals | 7 | Physical Plant | R | Revenue |
Include Period 998: Check this box if you want to view period 998 adjustments for the selected org. This is only available for non-GPR funds. The period 998 adjustment will appear as a line in the cash balance presentation.
Q: What do the report options on the summary report do?
A: The report options will be the same regardless of what department is selected; however, the report may look different. The reports differ for GPR funds and non-GPR funds. The report options allow the user to select the following options:
Project Option: Select “Only Departments”,“Both Departments and Projects” or “All Projects Summarized”. If the department does not have transactions both with and without Project ID’s, these options will not be selectable.
Time Period: Select the accounting periods to view in the summary report. The default value is Year To Date. The “advanced” link will allow selecting specific periods or quarters.
Account Tree: Select the account tree used to build the summary report. The account trees are created in PeopleSoft and are copied over to WISDM. For more information on the trees available for your business unit, contact your WISDM administrator.
Drilldown Level: Select the level of detail for the summary report. The drilldown level coincides with the account tree. The selections go from least detail to most detail. The lowest level of detail usually shows the individual accounts.
Program: Select the programs to view with the report. The only options for Program Code are to view all the program codes in the summary, or select only one program code. The program codes (formerly activity codes) are based upon the expenditure classification published by the National Association of College and University Business Officers (NACUBO). The programs used by UWSA are:
| Code | Description | Code | Description | Code | Description |
| 0 | Student Services | 4 | Research | 8 | Auxiliary Enterprises |
| 1 | Institutional Support | 5 | Public Service | 9 | Financial Aid |
| 2 | Instruction | 6 | Academic Support | F | Farm Operations |
| 3 | Hospitals | 7 | Physical Plant | R | Revenue |
Include Period 998: Check this box if you want to view period 998 adjustments for the selected org. This is only available for non-GPR funds. The period 998 adjustment will appear as a line in the cash balance presentation.
Q: Why do some report summaries have a cash balance section, while others do not?
A: GPR funds do not show a cash balance section, since GPR funds do not carry a cash balance. Non-GPR funds show a cash balance section.
Q: I have access to several business units' information. Why is the cash balance section different for different campuses?
A: There are two different cash balance presentations available in WISDM. One based on fund balance (account 8700), and the other on cash (account 6100). Each business unit decided which presentation they wanted to use.
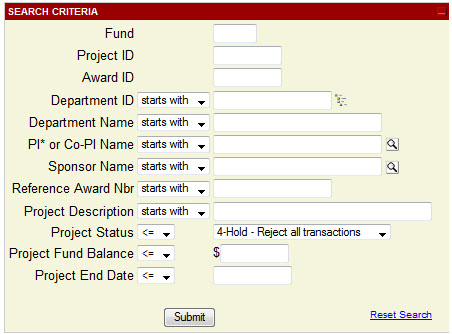
Q: What are the fields in the 'Project Search' screen?
A: The following fields are used in the 'Project Search'. Any combination of fields may be used to search.
Q: What results are returned by the 'Project Search'?
A: The results returned will match the Project criteria entered from the search screen. There are hyperlinks on the Project to see detailed information specific to that project. There are also hyperlinks on the Department to filter by Projects for that Department.
Q: What fields are used in the 'PO Search'?
A: The 'PO Search' uses the following fields. You may use any combination of fields to search.
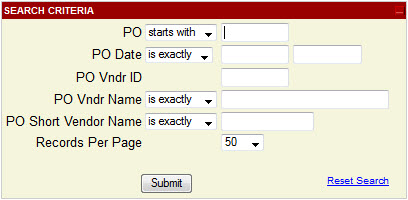
Only one field needs to be completed to perform a search, but the more information entered, the more precise the results will be. Wildcards like % (look for many characters) and _ (look for a single character) can be used in the PO, PO Vndr Name and PO Short Vendor Name fields. When using wildcards, be sure to change the search terms dropdown menu from "is exactly" to "starts with".
PO: Enter the entire Purchase Order Number.
PO Date: Enter the date of the Purchase Order in mm/dd/yy format.
PO Vndr ID: Enter the entire 10 character Vendor ID number.
PO Vndr Name: Enter the Vendor Name as it appears in SFS. The dropdown list contains:
is exactly – Enter the entire name
starts with – Enter the beginning of the vendor name
PO Short Vendor Name: Enter the short Vendor Name as it appears in SFS. The dropdown list contains:
is exactly – Enter the entire name
starts with – Enter the beginning of the vendor name
Records Per Page: Select the number of pages to view per page. The options are 50, 100, and 500.
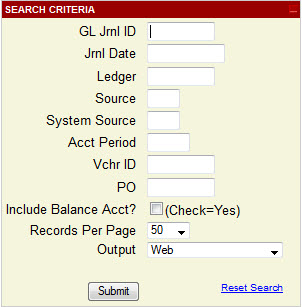
Q: What fields are used in the 'Journal Search'?
A: The 'Journal Search' uses the following fields. You may use any combination of fields to search.
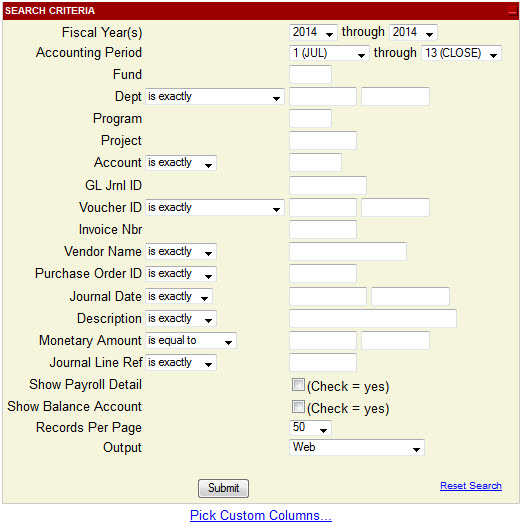
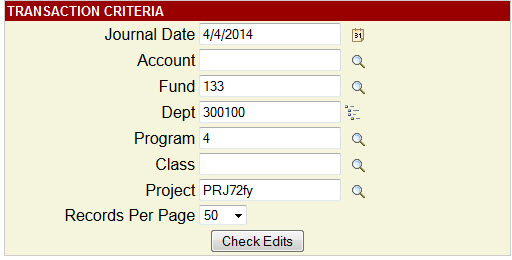
Q: What fields are used in the 'Transaction Search'?
A: The following fields are used in the 'Transaction Search'. For performance reasons, this search requires you to enter at least one of fund, department, program, project or account among your criteria. The more criteria entered, the faster the results are returned. The wildcards % (find many characters) and _ (find one character) can be used in the fields that use a "starts with" selection. Clicking in any field provides a pop-up note with expected/example field information.
Q: What fields are used in the 'Funding Validation/Inquiry'?
A: The following fields are used in the 'Funding Validation/Inquiry'. This page validates funding for any institution. Enter a funding string (Fund, Dept, Program required) and click 'Check Edits' to confirm if the string is valid. The edits and error messages are the same as entering funding in SFS.
Q: Can I specify which fields I want to see in the result of the queries?
A: Sometimes. On several different search results, there is a link called "Pick Custom Columns..." which allows you to specify fields used in the query. On the 'Transaction Search' screen, it is seen at the bottom. You can scroll throughout this view to choose the available fields. Select the fields to view by checking the corresponding box. The fields selected will stay as selected until changed. This feature is also available with other WISDM searches. The fields available will vary based on the search performed.
Q: What is the 'Budget Control Report'?
A: The Budget Control Report gives a breakdown by funds for all departments specified in the search criteria. The search box looks like the following:
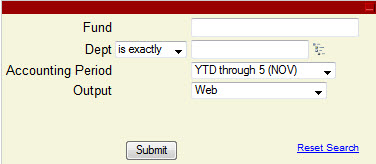
The search requires a selection for the fund, the department, the accounting period, and an output option. The default for the accounting period is year to date through the current period. In the result set, the Beginning Cash and Ending Cash Balance columns are only shown for non-GPR funds. The Budget Balance column formula is Expense Budget + (-Sales Credits) - Encumbrances - Expenses.
Fringe benefit expenses are included in the expenses, so if viewing information for a GPR fund that does not encumber fringes, the budget balance may vary from what is expected.
Q: How do I change my password?
A: From the main menu, choose "My Profile" and click "Change Password". Remember the following password requirements when creating a new password:
Password must:
- Be at least 5 characters long
- Contain at least one digit
- Contain at least one letter
- Not contain your user name
- Have a letter as the first character
Q: Can I specify the default tree level for summary reports?
A: Yes. From the main menu, choose "My Profile" and click "Account Tree Levels". The following screen will load:
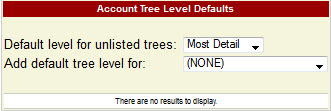
There are several options on this screen related to trees. The first option is "Default level for unlisted trees". This option dictates how the summary reports will first appear. The summary report will be shown at either the most detail (specific accounts) or the least detail (Revenue and Expenses).
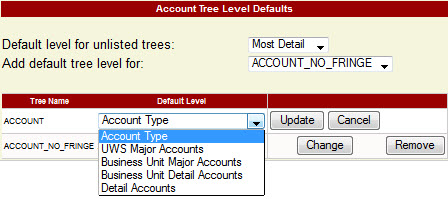
In addition to this option, you can set certain levels for specific trees used frequently. To choose a specific tree's default level, select the tree from the "Add Default Tree Level For:" list. The tree will appear below, with a dropdown list of the tree's levels.

To select the tree default level, click "Change". In the example above, the ACCOUNT tree and the ACCOUNT_NO_FRINGE have a default level of "Account Type", which means when these trees are selected from the dropdown list, the Account Type level will open.
Choose a default level from the dropdown menu and click "Update" to save your changes. The tree levels can be changed within the summary reports, but this feature saves you a few clicks.
Q: Can I limit the trees I see in my summary report options?
A: No. Only the WISDM Business Unit Administrator can limit the trees seen in the dropdown lists. These limits will affect the entire business unit.